Tuesday, May 25, 2010

More Wobble Diagnoses

Here are some responses to my previous post on wobble:


1. I'd mention how non-parallel drops will bow a hub axle & 'cone' out the bearing seat(s). I went through a couple hubs before I realized this. -WeedBMX


2. Some bearings just simply have play in them too. I've cured some wobbly hubs with new, higher quality bearings. I've also cured some hubs that are way too tight with once wobbly bearings. Although very very tight, bearing manufacturers also have a tolerance to work with. - Couch of Zodiac Engineering


3. It is very important to distinguish between bearing arrangements that may LOOK similar, but behave in different ways.

With a crank:-

The load acts in a relatively constant direction relative to the OUTER race, so the INNER race "sees" a load which acts radially but at a varying direction.

ie. if you mark a white dot on the inner race of the BB bearing, then when the dot is at the bottom, the load acts to push the axle INTO the dot.
But when the dot is at the top the load acts to pull the axle away from the dot.

So it is important that a crank axle is a fairly close fit inside the bearing to prevent the axle "rolling around" inside the race and causing wear.


With a hub:-

The load acts in a relatively constant direction relative to the INNER race, so the OUTER race "sees" a load which acts radially but at a varying direction.

So with a hub, it is more important that the OUTER race is a good fit in the hub shell and the inner race can be a looser fit on the axle (which helps allow the bearings to align with each other).


There are a number of standard bearing "arrangements" based upon whether load is radially oscillating or constant; and that "fully retain" different races. For the record it is "incorrect" to fully retain all the races. Bearing mountings should allow for differential thermal expansion of different components. - G of
G-sport

Saturday, May 8, 2010

Diagnosing Wobble

What is wobble?

Wobble is play or movent in a bearing system. Cranks and hubs will experience it as latteral (axial; side to side) play, while headsets most often exhibit radial play. Although there is a difference in the tensioning mechanism of the two systems, some of the reason the play is different is due simply to the way we test for play: sitting attop our bikes shaking things around.


What causes wobble?

Even though the three bearing systems in our bikes (hubs, headset, and bottom bracket) are slightly different from one another, they all operate on the same principals. Essentially a bearing is placed at the interface of two tubes (headtube/steerer; spindle/BB shell; axle/hub shell) in order to minimize friction between the surfaces. In conventional threaded, poorly sealed systems, the ball bearings are held in place by positioning the inner race against the balls just enough to hold everything steady, but not so much as to add resistance to the system. This direct adjustment system is very simple and easy to understand; BUT it is finicky, and annoying to deal with under a time constraint.

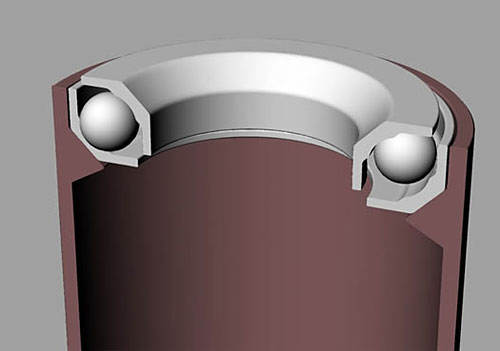
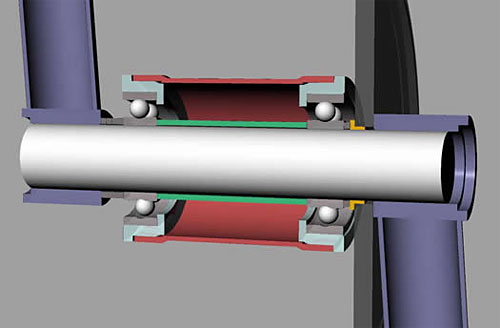
We have moved, almost entirely, to sealed, cartridge bearing systems. These are bearings in which the inner and outer races entrap the balls or rollers in one assembly. These cartridges are easily installed and removed (except when the bearing shatters and the outer race gets stuck), have virtually zero maintenance, and reduce working time. In cartridge bearing systems, the inner race of the cartridge is fixed on both sides, while the outer race is only fixed at inside.

Image from George French's Ride UK article Three Piece Crank Assembly


There are a few main causes of "wobble" in a bearing system:
  • Poor inner race tension. This is the most common cause of wobble. On a normal, one piece axle system (conventional thread-on cone nuts), this can be the result of stripped threads, no spacer between driver and hubshell bearings, or poor bearing shoulders causing the cone nuts to run out of threads. On "sliding hardware" hubs, headsets, and crank sets, the tensioning bits (collars, spacers, stem, arm, etc) need to transfer force from the tensioning bolts while allowing the axle to slide beneath. What that means is that you need to add spacers so that the axle/steerer/spindle does not bottom out on the dropout/topcap/crank bolt. As you can see in the below photo, G-sport hubs require the collars to stick out farther than the inner axle (just as the crank arm and stem must be higher than the spindle and steerer). This is true of all female axle hubs that do not sit in the dropouts.

  • Poor bearing seats can also be a cause of wobble. Many people are familiar with ovalized headtubes, but the same thing can happen with bottom brackets and hubshells, usually from poor manufacturing. If the outer race is not secured properly, wobble will be virtually impossible to remove. To reduce a knocking sound, you can add grease or a retaining compound to the bearing seat; But a perminent solution is to change frames or hubs.
  • Poor interface between crank arm and spindle can lead to axial and/or rotational play. This only really happens on cranks because they are the only interface where rotational loads are constantly supported. Here is an article about interface wobble in 48-spline cranks, specifically Profile Racing cranks.
  • Blown bearings aren't as common as they used to be, but some times it happens. Try not to install or remove bearings by their inner races, as that puts axial load on conventional bearings that are not intended to handle such loads. The obvious exception is when dealing with angular contact bearings (such as most integrated headsets):


Conclusion

So the next time you find some play in your ride, before cursing some company with "******* Wobble", think about what could be causing the wobble. Maybe just adding some shims, or cutting a small bit off the axle or steerer is an easy solution.

Wednesday, May 5, 2010

Rubber Side Down: A look at tires

"What tires are you running?" is a common question in all types of cycling. In BMX, we ride on widely varying terrain: smooth, slightly dusty concrete parks; rough asphalt roads; dusty, dry dirt; and even some rock infested trails. So which tires is best? In order to answer that, we have to look into what tires, compounds, and tread excel in which conditions.


Park: Smooth concrete, wood, metal

Taken from a simple perspective, the best grip at the park will come from the largest contact patch. So in a well cleaned park, treadless tires like the Primo Comet tend to work best. It's similar to car racing. The formula one cars zipping around at 200 mph do so on smooth tires. But as the conditions of the ground become more rough, or debris such as dust and water are introduced, the performance of smooth tires suffers.

When your car hydroplanes, it does so because the large contact patch of the tires distributes the weight well enough to not break the surface tension of the water it is resting on. This is where tread and narrower profiles come into play. Road bike tires are narrow enough that they slice down to the asphalt below. A similar thing happens with dust: the smaller the contact patch, the higher the pounds per square inch (psi) of pressure. Higher psi helps push the dust out of the way, getting down to the nicer ground.

Too much tread at the park can lead to an unstable contact with the ground. As one knob, or section of tread slips out of grip, the traction can suddenly change., which is never fun.


Street: a need for toughness

Two things happen when switching to street: the ground tends to be rougher and more diverse, calling for more aggressive tread than is necessary in park riding; and the rougher ledges and riding call for more sidewall toughness. I say toughness, because a stiffer sidewall is not necessary, just one that resists abrasion and tearing better.

Many "street" tires, like the legendary Primo Wall tires use heavy nylon sidewalls and casing. Although nylon provides good resistance to damage, it is relatively stiff, heavy, and has greater hysteresis (internal friction) than the Kevlar and cotton casing materials (at least in the low threads-per-inch count of many BMX tires).

Cotton is simply too easy to tear to use in a street tire. So a slight increase in hysteresis is necessary for the resilience of Kevlar casings. Perhaps this explains the long lifespan of Revenge Industries (S & M) tires. The low-profile, semi smooth tread, thin Kevlar casing, and now available in different sizes and with a folding (Aramid/Kevlar) bead make this tire a great choice for riders who find themselves riding street as much as park.


Dirt: where smooth tires hurt

I don't know about your trails, but all the ones around here (San Francisco) are covered in a layer of dust. As discussed earlier in this post, smooth tires are terrible in dusty conditions, they do not get down to the supportive ground underneath. This is why tread is the name of the game. How aggressive your tread is depends on the trails you're riding. If the dirt is relatively smooth, then a low/medium tread will give you the most solid feel (without the squirm-i-ness sometimes prevalent in higher knobs). As the terrain becomes more rocky and full of ruts and roots, you'll want to increase the tread. A tire like the Maxxis MaxxDaddy will give good grip in rougher terrain. But be warned, these tires have preferred channels to sit in when cornering. They will feel a bit on or off, but once you feel out where that channel is, you can rail any corner.

Some people, myself included, like to go with little grip in the back, but a nice grabby tire up front. This is because your front tire is leading, where it goes, everything else will want to follow. So if your front washes out, your down. But in the rear, it can be helpful to drift around corners, or slide the back when over rotating. The trick to making this work is to ride the front wheel. If you keep your back end light, you wont get sucked down when its sliding.


Summary

Tread:
None: Good for smooth, clean park riding, and some street applications

Little: More tolerant of contaminants and rough terrain, so it works better as an all-around tire

Medium: Grippy on rougher asphalt and dirt conditions

Tall/Heavy: Almost exclusive to Dirt riding as it may feel unstable on more consistent terrain.

I'd like to talk about Durometer ratings, but only a few manufacturers provide ratings like Maxxis. In general, lower durometer ratings (below 60) provide a softer feel, but wear away faster, while higher ratings (65+) are harder. Interestingly, Maxxis uses higher rated rubber in their higher tread models.


Casing Material:
Cotton: Common, cheap, light, and relatively low hysteresis (Dirt/Park)

Nylon: More common, cheaper, much better toughness, but heavier and higher hysteresis (Low cost Park/Street)

Kevlar: Some variety, higher cost, very good toughness, lighter and lower hysteresis than nylon (Park/Street)

Higher threads-per-inch casings provide lower hysteresis, a more comfortable feel, and good protection agains tears, but are generally more expensive. Most folding tires are higher TPI (120+), while steel beaded tires usually run lower (60-100), but again, few manufacturers specify what they use.


Bead (almost independent of riding style):
Steel: Very low cost, heavy, and stretches with higher inflation pressures

Aramid/Kevlar: Higher cost, significantly lighter and stiffer, and does not stretch


Inflation pressure (depends greatly upon tire):
Lower: tire forms over rough terrain better, feels less solid or like a rail, more likely to pinch flat, greater give when landing, higher rolling resistance, and more likely to blow off the rim

Medium: Good rolling resistance, good pinch resistance, fair impact absorption, and good traction and stiffness

High: Slightly less rolling resistance, rare for pinch flats, low impact absorption, poor traction over debris such as rocks, ok traction over dust and water (due to a smaller contact patch), feel much more like riding on rails


Further Reading:
Sunday, April 25, 2010

Warranty Claims

I've had a number of cats come through the bike shop lately with various warranty claims. Some are legitimate (such as a new KHE tire's blown sidewall), while others are completely rider error. In this post I intend to discuss the purpose, scope, and effects of the warranty process...


A Little History

There was once a day when a manufacturing failure would lead to the rider swear off that particular company for life... or until they came out with some far too cool new part. At the same time, the quality of complementary that made its way into the BMX market was marginal. Tolerances were wide open, if specified at all; and materials were often very poor. What this did was leave an opening in the market for some quality.

Enter the high(er) quality manufacturers. Profile Racing began offering tight tolerance machined hubs; Primo introduced their cold forged Powerbite cranks (cold forging offers greater tolerance control than casting or hot forging along with good grain orientation in the outer limits of the structure). These components earned a reputation for being less likely to bend, break, or snap. But how could companies compete with high end, and high dollar, components?

In the late 1990's Odyssey took a turn from mediocre quality, fair variety components, toward a different business model. The idea was to introduce two concurrent and complimentary ideas to their product line: post weld heat treatment for their forks, and a no-questions-asked warranty.

41 Thermal, as they call their heat treatment regimen is designed not only to reduce the heat affected zone inherent in welded components, but also to make the component bend noticeably before breaking. From this, Odyssey forks developed a reputation for being extremely strong, while staying cost, and weight competitive. Even though there have been quite a number of bent components over the years, the easy, and fairly quick warranty process has reduced the amount of negative feedback on their components.

Today, it is quite common for riders to suggest purchasing Odyssey components because of their amazingly lenient warranty process (Nuno even offered to warranty my cracked Polycarbonate Twisted pedals!) Picking up on this, many other manufacturers have eased and streamlined their warranty systems. They have learned that supporting the rider, even to some immediate detriment, can have long term beneficial effects.


Purpose of the Warranty Process

You can ask around and I am sure you will get various responses to this question. My response is from the perspective of a shop manager, rider, and prospective manufacturer. The warranty process should be designed to induce a positive company image in the mind of the rider. What this means is that a component should not fail without due cause (i.e. riding hard will inevitably damage parts, especially when we get into lighter weight components). If a component fails due to manufacturing errors, it should most definitely be covered under warranty. A common example of this is a crack directly on a weld, which indicates contamination in the melt pool, and subsequent weld.

There is another purpose, as the Odyssey example shows: to increase customer base simply because of the streamlined warranty process. Although I do not list this as a primary reason for purchasing a particular component, it is certainly beneficial to the rider; even more so if they are on a budget.


When a claim goes too far

I had a cat come into the shop with corroded nipples on a machine built (pre-built) wheel. He claimed it was a warranty issue because he had never see that happen before. Perhaps unfortunately for him, I had. The corrosion was due to excessive sweating seeping onto the aluminum nipples. The electrolytes in sweat increase the rate of oxidation (and on some materials nitrogenation) of materials. Often these oxides are much more brittle than their parent materials, leading to sudden failure or cracking. The point is manufacturers have no way of knowing, nor a reasonable way of preventing all of the outlying conditions that may lead to failure.

So the next time a part fails on you, ask yourself a few questions:

* How did the component fail (break? bend? where? how much?)?
* What lead to the failure?
* Could it have been a manufacturing issue?

Of course you could send in the product in any case, but if they deny your claim, don't give them a bad wrap if they conclude that it is not a manufacturing issue. If they do deny and you feel it is unjust, post it up on line with the question of whether it is a manufacturing fault.

Wednesday, April 7, 2010

Cold Forging at Shimano

Primo Powerbites, and now Hollowbites are advertised as being manufactured using cold forging technology. Effectively, they are smashing a blank piece of metal into the shape they want. Cold forging offers the advantage of precise control over dimensions, no need for heat treating, and aligns the grains along the surface of the part, perpendicular for forging direction. Hot forging, on the other hand, works better at aligning all of the grains of the part (up to a certain thickness, based on material characteristics), but cannot control dimensions as well.

Here is an article on Cozy Beehive about the cold forging at shimano. You'll notice the following graph, which may explain why some of the newer forged sprockets (such as Eastern's Medusa Lite, and Stolen's Mood Ring) are forged from 6061. Kudos to Primo for using a stronger, albeit tougher material to work with:

[forgeability+al+alloys.bmp]

Sunday, April 4, 2010

BMX and Hygiene

Ok, I accept that many, perhaps even most, BMX riders are in their teens. As such, they may just scoff at this post. But there are good reasons why all riders (BMX and otherwise) should care for their hygiene:
  • Some people like the sickly-sweet smell of fresh sweat; nobody likes the smell of old, bacterially digested sweat.
  • Calloused hands show you work hard, but don't feel so nice against soft skin.
  • Fresh smelling pads and riding cloths will keep you excited about going out for a ride.

Hand Care

First things, first, when you're done riding, working on your bike, or otherwise, it is good practice to clean off after. Soaps can leave your skin dryer than they began. Even "moisturizing" soaps don't quite do it for me. I highly recommend Phil Wood Hand Cleaner. It is an oatmeal based hand cleaner that leaves your hands feeling refreshed, clean, and supple.

tub of hand cleaner

But Phil's hand cleaner won't be enough to remove the grater that is some riders' callouses. For this, there isn't much better than a pumice stone. Properly shaped, and preferably with one side bonded to tough nylon bristles for cleaning out under your finger nails, these little gems will let you round off and reduce the callouses. To work properly, hop in a hot shower; once your skin has soften, gently round off the callouses. You'll be surprised how much callous skin can be removed.


Foot Care

You can use your new pumice stone to soften the callouses on your heals and toes as well. The nylon bristles work well as a quick exfoliant to remove dead skin cells on top of your skin. And remember to clean and trim those nails too! Removing dead skin cells will give bacteria less to eat, producing less smelly excrement to make your shoes smell.


Clothing

Cotton sucks! Sure it is cheap and readily available, but it absorbs moisture, leaving a dark, humid environment for those little nasties to have a field day. Many synthetics, and animal fibers (such as wool) do a much better job at moving sweat off of your skin and out to be evaporated, and effectively cool you. So should you go out and buy some synthetics to help you keep cooler, and smell less? Sure, if you can find some you would be comfortable wearing at the skate park.

Many bicycle shops will stock a good variety of aesthetic options for jerseys that will keep you cool. Shorts are a different story. I'd look to MTB shorts, as many of them have removable chamois. Fox racing offers a full line of MTB gear that may match your style. Have a look through MTB catalogs on line or in your local bike shop to find something you like.

In some cases, their either isn't a non-cotton choice, or no choice you would be caught at the park wearing. This especially hit me with pads. I have a full set of leg padding, much of which is constructed with cotton or (even worse) polyester. I could toss them in the washing machine, but I worry the stitching will tear and the pads will begin to fail. A solution I heard from a cat while I was in Oslo, is to toss the pads (pants, shoes, etc) in a zip-loc bag, and put it in the freezer over night. The extreme cold temperature will kill many bacteria, leaving your cloths relatively odorless.


Haircare

Wash it. But find some shampoo and conditioner that matches your hair (dry, regular, oily) in the current season. This is also a time to pick a scent for your hair. Trust me, its nice with a little decedent scent.


It can be expensive, but I adore L'occitane.

Bottom Bracket and Crank Standards

Browsing around the Cozy Behive, I found and article on the evolution of bottom brackets and interfaces in road and MTN bikes. Unfortunately, no mention of BMX bottom brackets. Here is the BMX-U page on BB's.

BMX has gone through the same evolution (loose ball, cartridge, press fit); the only difference being that BMX adopted the cupped, press fit US bottom bracket. Since then, we have moved independent, albeit parallel to the development of road/mtn bottom brackets. We have arrived at something very similar to the BB30 standard:

BB30: 42mm ID 68mm width
MID: 41.275mm (1 5/8") ID, 68mm width


Advantages of BB30

BB30 uses a standard metric ID, which makes off-the shelf bearings available for up to a 30mm spindle. Though it should be noted that to fit a fair sized bearing to take the extra side loads our bikes encounter, it may be best to limit spindle size to 25 mm. Even so, 25mm is larger than our existing 22, and 19mm spindles. With this increase comes the prospect of high strength 7068 or 7075 Aluminum.

Using an existing standard accepted by the rest of the cycling industry opens up the BMX market to larger manufacturers, higher technologies, and respectively, BMX companies' customer base. Hopefully, expanding their market will help smaller operations survive. Profile has a similar situation with their 48 spline cranks and dirt jumpers.


Thursday, April 1, 2010

Force Vectors in Road Pedals


Here is an interesting article about the work that Metrigear is doing with their pedal mounted Vector power meter. Although this is all focused on strain gages in road cycling, it is not too much of a stretch of the imagination to use strain gages in BMX to quantify the loads we place on our bikes. Someday...


Monday, March 22, 2010

A closer look at detanglers (Gyros)

Although they have gone a bit out of fashion, I have always found detanglers to be an integral part of my brake setup for two reasons:
  1. I NEVER have to unwind my bars/cable(s)
  2. Properly setup, the load is distributed over two cables, rather than one. This leads to an increase in stiffness, as well as providing a failsafe in the event that one cable snaps.
On that note, I highly suggest the use of a dual cable setup (either with an Odyssey Modulever, or something like the Dragonfly/Snafu adapter) and brake noodles for the lower bends.


Note: No detangler manufacturer recommends disassembling their units, nor should it be necessary unless you lubricate a bushing detangler. But I find these things fun and throw caution to the wind :)


But this post is about the guts of detanglers, so lets get on to that. The original Gyro (or Oryg) is pretty easy to figure out: 2 pieces of stamped and bent steel with loose-ball bearings. These use no lubrication; actually, they require no lubrication be used. By doing so, debris is able to freely pass through the bearing mechanism without being trapped by lubricants.

Advantages:
  • Cheap and easy to manufacture
  • Replacements are available at almost all bicycle shops
Disadvantages:
  • Flexy
  • Can be noisy and not so smooth when debris is present
  • Prone to "gyro flop" where the detangler shifts side to side due to uneven cable lengths (which can be adjusted out, but is more difficult than newer detanglers)


Next came the Odyssey GTX sealed bearing detangler(s). The original steel has been discontinued due to much better sales of the lighter GTX-R aluminum version. Both are a good improvement on the above Gyro.

Advantages:
  • Sealed to keep things running smooth for a good long while
  • Very stiff assembly reduces the incidence of "gyro flop"
  • GTX-R (aluminum) is a good bit lighter and available in red and blue anodizing
  • Long lasting (I have never worn one out)
  • Built in set screws for custom cable setups
  • Can be disassembled with a flat head screw driver
Disadvantages:
  • Set screws tend to fray cables, deterring many people from using them
  • Virtually all cable heads require modification to not hit one another. The main culprit is the seats for the cables were machined shallow to allow for the set screws
  • Significantly more expensive than competition
  • Difficult to rebuild as balls do not easily hold in the retainer


A response to the GTX by Snafu, and more recently Stolen, is a simple Teflon bushing detangler called the Mobeus (or Satellite).

Advantages:
  • Cable heads sit snug and clear one another
  • Bushing requires no lubrication
  • Lower cost and weight than GTX (though the GTX-R is within 0.2 oz)
  • Low profile
Disadvantages:
  • When lubed, debris builds up quickly and rapidly degrades performance
  • Some people complain of binding when pulling the brakes during a tailwhip
  • More prone to "gyro flop" than the GTX, but less than Gyro/Oryg
  • Requires snap ring pliers to disassemble


Wednesday, March 10, 2010

An Issue (and Solution) with Investment Casting

I was flipping through the Industrial Design Guide that I posted up a few weeks ago, and came to the page about investment casting. When I read some issues with the casting process. Typically, when the metal is poured into the mold, there are some unindented inclusions like Oxygen, metals, or other containments. Also, the act of pouring the metal creates turbulence and may allow pores to form, leading to compromised product integrity.

A solution to this is the Hitchner Counter Pressure Process. Basically it is filling a mold from the bottom up: You use vacuum pressure to pull the molten metal into the mold at a controlled rate. By doing so, the metal flows freely, with significantly reduced turbulence, and a better finished product. Certainly, there is an initial investment cost for moving to this method. But as with all manufacturing, diligence in pursuing cost-effective advancements will lead to better competitiveness.

Tuesday, March 9, 2010

Fair Wheel Bikes Road Hubs Review

Wow, what a massively comprehensive review. Thanks to the guys at Fairwheels for their continued contributions to the cycling community! Although it is all road stuff, There is quite a bit we can take from this. I'll write a post sometime soon discussing the various designs available for cassettes. And here is an interesting quote about bracing angle. I am sure the square rule works well as an approximation for road wheels, but I wonder if it is accurate as we get down to smaller rim diameters:

Notes on Bracing angle: Bracing angle (or flange offset) is the most important factor effecting the lateral stiffness and stability of the wheel. The lateral stiffness imparted by the spokes goes up with the *square* of the bracing angles, while using more or heavier spokes only results in a linear increase in stiffness... and an increase in weight.


And now for some hub porn

C-4 Flangeless
Image


Alchemy with super wide bearing and flange spacing
Image

Tune carbon-wrapped flangeless:
Image
Alchemy rear with bearings inside and outside driver to maintain concentricity

Image


Tune with Carbon-fiber axle. Who wants to be the first to test this with pegs ;)

Image

Monday, March 8, 2010

Some updates to the blog

I finally found the motivation to do some regular maintenance to the blog. I went through all of the posts and added labels. Hopefully this will make it a bit easier to reference and navigate. The "cloud" of labels is on the left side of the blog. Give it a try and let me know what you think (i.e. do you just want a list?).

Also, I noticed that I never linked to the bearing article I posted a few months ago. By now, that information is up at BMX-U, so have a look.

Some BMX Tech issues

Some of you may have noticed that when you went to bmxtech.blogspot.com over the weekend, it would redirect to some funky (and likely malicous) site. Apparently it was tied to the hit counter gadget. Thanks to this article for explaining the issue. I hope none of you got into trouble with this.

Wednesday, March 3, 2010

Swaging

I've noticed a lot of forks and frames using "swagged" and tapered tubes. But what exactly is swagging? Usually it is a colt working or forging operation to reshape a tube. Here is the Wikipedia link. And some videos: 1, 2, 3

Although the three videos here show increasing the tube size, it is used in BMX to reduce or reshape the tube.

Tuesday, March 2, 2010

Chain Tensioners

... Or wheel positioners. It really depends on your purpose for putting them on. You may want them to maintain a consistent chain tension, like my tail-whip fiending friend, so the pedals will stay in position when your feet leave them. Or perhaps your wheel moves on you when you don't have it slammed in the dropouts, but slammed, the chain is too loose. A positioner will allow you to give extra support to prevent the wheel from moving. This post will analyze the various types of possitioners available and weigh their pros and cons against one another.


Pull-Type
The original tensioner design consists of a washer around the axle, with either a stud and nut, or bolt. The bolt/nut tightens against a plate on the end of the dropout
Some pull-type tensioners have issues with shorter dropouts. But as of late, slimmed down designs (such as the Poverty Short Stop shown above) have almost done away with that problem.

A variation on the design is the Premium SS Tesnioner, which uses the bolt to push directly against the dropout. With the proper bolt size, this tensioner can work with any size dropout. Unfortunately with only a bolt in contact with the curved end of the dropout, it can move around pretty easily.


Push-type
These tensioners have appeared in recent years in two variations:

1. Integrated tensioners into the dropout use a set screw or bolt through the dropout to push the wheel back and into possition. The pressure on the axle threads may compact them slightly. This may cause some issues on hubs with threaded collars, and may allow the wheel to slip forward slightly as the threads compact. (ex: Sunday wave dropouts)


2. Bolt-on tensioners use a bolt-on tab similar to gyro tabs and cable guides. They push on the hub collar rather than the axle itself. In some cases there can be interference with the chain and/or driver. (ex: Fly Tierra)


Spacer type
In the past, riders have jammed various items between their axle and dropout to allow their wheel to be "slammed". I used aluminum cable ends crushed down and carefully inserted, but they would continue to compact, and were difficult to work with. Simple BMX has come out with specially cut spacers in 0.1mm variations. With the availability of half-links (albeit current designs are rather flawed in that they stretch easily), a wheel only needs up to 13mm of adjustment as the chain is 12.7mm pin-to-pin. Unfortunately there are reports of these compacting down (or more likely compacting into the threads of the axle)


Drive vs. Non-drive
With the chain on the drive side, tensioners only need to work in one direction (the chain works in the other). As such, tensioners have been designed to work only moving the wheel out of the dropouts. The problem arises when working with the non-drive side, especially with pegs. When a load is taken pushing the drive side axle out of the dropouts (such as an ice pick or tail tap), the tensioner does not support the wheel, and thus it can move out of position. To fix this problem, we may want to start looking into a hybrid push-pull tensioner. I have done some work integrating this into a hub collar and/or guard. I'll post up more info when I get some prototypes done...

Monday, March 1, 2010

Book Recommendations

I've been doing some reading as of late. Here are two of the books I found most useful:


Industrial Design by Jim Lesko

I picked this book up at the local library expecting the usual design crap: Furnature, cars, and hubless wheels. To my surprise, I found a well organized overview of manufacturing methods for a variety of materials. The book doesn't go too in depth into any particular subject, but it provides a nice introduction and reference for the aspiring product designer. More than just an easy read, Lesko includes many informative diagrams. These pictures are worth a thousand words; I highly recommend this to anyone getting into the field/hobby/whatever.


The Ice Cream Maker by Subir Chowdhury

I know what you are thinking, "what the hell does this have to do with BMX?" This short (115 pg.) book is the tale of an ice cream factory manager who develops his company into a more efficient, competitive, and quality-focused organization. The book focuses on how supporting your customers and community (that includes everyone from the employees, to the people who live around you), in order to create a healthier, more self-sufficient organization. For any of you in management, or looking to get into business for yourself, this is a required read :)

Monday, February 22, 2010

How are the Director dropouts held together

I did a post a few days ago listing the Director patent. It was chalk full of interesting stuff. But the question quickly came up: How is the dropout insert held in place. The drawings show a seam weld, but those don't appear on production models. Eggit helped clear it up with some rawing and bluing of his:

Dropout insert from patent


Eggit's photos show spot welds holding it together


Edit: Comment from G

No spot welds.


Read the patent, look at fig 5 and item 67 in particular...

G.


An open attempt to improve axial free coasters

A few members on BikeGuide have started discussing how to improve axial coasters. The idea is to come up with a design that can be easily made and will at least improve the issues faced with axial freecoasters. Here are some requirements (see the thread for more details):

  • Low cost (i.e. using as many existing components as possible)
  • Low(er) weight; sub 20 oz
  • Suitable for peg use, not necessarily abuse.
  • Better bearing system, especially in the driver
  • Easy, and safe maintenance (i.e. no little pieces to damage)

If you have suggestions, or would just like to participate in the process, please post your comments in the BG thread, or here and I will forward to the thread. Once we come up with something suitable, I will post the dimensions, CAD files, and any other info on BMX-U.

Wednesday, February 17, 2010

Director Patent and Construction

I was pleasantly surprised to find this in my Google Reader list this morning. If you don't know about Reader, it is a web based application for aggregating RSS feeds, updated search results, and other periodicals. The recommendation and searching functions are pretty good, but some of the BMX RSS feeds are surrounded by noise (i.e. one good feed with a bunch of dead ones).


Director Forks have interested me since they were first unveiled. Integrating the dropouts with the fork legs is a logical step that was taken by road and some mountain quite a while ago. Eliminating the weld at the dropout avoids cracks there as well. And using a simple insert gives good compression support, while maintaining a hollow dropout for weight. Overall a nice design. Unfortunately, since this is included in the patent, any other company who wishes to go the integrated dropout route will have to find a manufacturing method that does not violate George's patent.

The crown junction is another unique feature of the directors (unless you look at sunday's chainstay wishbone that G had a hand in as well). The claim is that it reduces localized stress and extra material found in conventional open ended steerers.

I'll dig into this deeper after some discussion, but I really have to head off to class, so this simple post is all that is going up for now :)


Some random feeds I subscribe to (post yours up!):

- Bicycle Design is not updated all that often, but can be interesting.

- Sweeter Skins for those of you with Android phones, this is really the future in UI.

- Roues Artisanales mostly posts in French about the road bike weight weenie scene.

- Cool Tools updates often with some neat little productivity tools.

- Scheier on Security is one of my favorite blogs. Written by a security expert who is often contacted to comment on security issues by media, government, and private agencies. He takes a very logical approach to dissecting issues. His post "Fear and Over-reaction" really struck a chord in me.

- Google Patent "Bicycle" Search feed updates every so often with new results (usually patent applications or updates). You can use Google patents to get customized results.

- Endless Innovation has some good posts, but can be a bit repetitive at times.

- Physics World has some neat, informative updates about research findings in classical, relativistic, and quantum physics.

- The Big Picture has great photography, and is updated very regularly. Each post contains a link to 40 high-def photos about a certain topic.

- F-Secure has regular, detailed computer security reports.

- Cycling Tech hasn't been updated in 2 months, but it has some cool stuff when they do.

- Industrial Design has a lot of design *cough* Crap *cough*, but you can find some real gems in there. Be weary of hub-less bicycles, there is a reason they haven't gone to production.

- Ted Talks are a great way to look at a situation from a particular (speaker's) perspective. They are all free videos on a very wide range of topics.

Tuesday, February 9, 2010

Baby Steps: a Summary of KHE Freecoaster Changes

Over the past 5 years, KHE’s freecoaster system has taken over the niche market. This was not because their product is the best we can do, but it is better than other options that were available (see my post on radial vs. axial freecoaster systems). In this post we will look at how the KHE system has evolved in its lifespan.


In the beginning was the Geisha. It offered a stud system (EAS) that allowed easy changing between 3/8” and 14mm in three different materials. That’s right, when it first came out, there were aluminum, steel, and titanium studs. They even went so far as to have a hybrid aluminum/steel clutch in their flatland version. The major advantage of the KHE was it’s ball-spring resistor, and low weight (Poverty coasters had the same resistor with a roller thrust bearing behind the clutch. But the resistor was eventually welded into place and the hub was pretty heavy in comparison)


Quickly after their initial run, the aluminum and ti studs, as well as the hybrid clutch were discontinued. To most people, this didn’t matter as the studs would unscrew with the axle regardless of material. Many would have preferred to use a bolt-on system (female axle), but KHE used a 3/8-26 thread in the aluminum spindle, which is very difficult to find bolts for. Blue6 now sells a bolt-on conversion kit for the KHE EAS system with titanium bolts and aluminum collars.


Now I am not sure if this next change came before the 1-piece axle or after, but it was an improvement none the less. KHE replaced the brass ball retainers with steel. Again, most people were unaffected, but to KHE’s defense, it was an attempt to fix the issue of customers tapping their axles out the wrong way (to remove any KHE axle, tap the drive side). Unfortunately, some people, when they encounter resistance, just hit the axle harder. Thus, customers still damage the retainers, and must purchase a new axle to replace them. I was always a bit annoyed that they didn’t make the retainers themselves available for the customers who damage them.


The next change marks the inflection point; when all of a sudden KHE took over the market, expanding horizontally to prevent competition. They finally came out with a 1-piece steel axle just before releasing the Federal and Reverse freecoasters. Both hubs were the same, but with different hubshells, and marketed under different brands. They both featured steel-one piece axle, but at a 4 oz weight penalty.


At this point, the Odyssey Reloader was out of the market, and the Poverty was rumored to be on it’s last run. KHE looked to fill the niche. They introduced LHD versions of both the Federal and Reverse. In order to do so, they would have to replace the threaded engagement ring with a splined one (if you run a threaded hubshell with LHD driver and clutch, the engagement ring will unscrew). There have been some issues with the splined ring coming loose, either by initial fit or compression of the aluminum splines. If you have this issue, retaining compound or JB Weld on the splines will fix it.


Some customers had issues blowing out the drive-side hubshell bearing. KHE attempted to fix this by switching the 6905 deep groove bearing with a 7905 angular contact bearing. Although not yet confirmed, it is believed the 7905 they are using is a 15 degree contact angle. Even this modest change can make a difference to someone who persistently blows out their drive side bearing. Unfortunately, the bearing seat is too thin to allow it to be bored out to accept an angular contact roller bearing, which would eliminate the issue all together (see Rob Ridge’s modified Reloader).


The drive side hubshell bearing was small potatoes compared to the driver bearing issues inherent in axial coaster systems (especially those with smaller drivers, unsealed bearings, and 14mm axles). KHE’s first attempt to resolve this issue was in the switch to steel in their 1-piece axle. The hope was that steel would better resist deformation of the measly 0.5mm bearing shoulder on the axle. It didn’t work. Their next attempt was to install a thrust bushing behind the 6902 bearings in the driver. I do not know how this has affected the number of driver bearing issues, but can’t help see it as an attempt to again fix the symptom (blown bearings) rather than the problem (axial wheel loads on the driver bearings).


Their most recent attempt to fix the driver issue was to have a custom bearing made by reducing the inner diameter from 15mm to 14mm. This gives a 1.5mm shoulder as opposed to a 0.5mm one. Although I like that they are addressing the issue, custom bearings always create headaches (such as buying a new axle that won’t work with your existing bearings). And again, it is not a proper solution to the underlying problem.


And finally, the one I skipped: somewhere along the line, KHE made a modification to the 1-piece axle to allow external slack adjustment. This was the first coaster to do so. It uses a simple screw attached to the internal stop-washer. A nice improvement indeed, but I have felt no inclination to change my slack, once set to my preference, in any of the coasters I have ridden.


So what can you take out of all of this?

  • KHE has made incremental improvements in their design over the years. This extends the lifespan of the product line.
  • KHE has committed to their system by expanding horizontally, now having 5 production models as nearly 50% of coasters currently available (Astern, Geisha lt, Reverse, Federal, Alienation).
  • Pushing KHE to make specific improvements may actually manifest them. Though look for incremental change, as they will likely milk this system for as long as they can before releasing something new (I hope they are working on a radial system, since they are still the only company to have released one, even if it was a failure).

Friday, January 29, 2010

The History of the Lathe

Here is a very in-depth look at the history of the lathe. He does a good job of explaining what advancements were made, and how those affected the materials used and the quality of finished turnings.

Tuesday, January 26, 2010

Gun Drills

Gun Drills are used for deep bores. And are usually equipped with channels for feeding coolant from the base to the end of the drill. Using a normal drill would not work because the flutes are not long enough to evacuate chips and flood the cutting surface with coolant. Drills are available in straight or spiral flutes (spiral drills are made by taking a two flute straight drill, heating, and twisting).


Here is a link that talks about making air gun barrels. Kind of a good description.

Thursday, January 21, 2010

Book Recommendation: The Noblest Invention


The first picture made me smile :)

300+ pages, but with short naration, packed full of side stories, short biographies, and historical perspective. It is a great, easy read (i.e. to be left out for guests or customers) that explained my love affair with bicycles better than I could. In a word, my bicycle represents Freedom. There is nothing I have felt better than the silence of a bicycle focused mind, hard-worked muscles, and a smile that just wont fade. This book kept me in the right state of mind.

p.s. I got my copy at the local library.

Sprocket/Crank Interface


In recent years we have seen a shift in sprocket/crank interface paradigm... Ok, that may be a bit exaggerated... At least there has been a change in design.


Traditional, Perpendicular Bolt

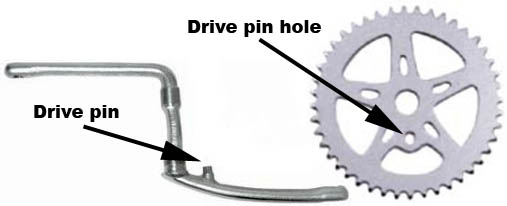
My first introduction to crank torque transfer was with the integrated stud on one piece cranks. Although effective, tolorances were often poor, and low-end sprockets were usually thin steel, further compounding any issues.


As BMX progressed, we moved to a bolt to secure the sprocket to the crankset (usually 3/8" or 10mm). Today, virtually all cranks use the bolt-on design. This helped solve some of the tolerance issues and has served as the standard for bmx. From a structural perspective, this design requires either a larger spindle boss or a separate hole cut in the crank arm for a sprocket boss.

A slight hybrid of one and three piece mounting systems, that has resurfaced recently is the use of a headless bolt. Mechanik makes a bolt called the Pin Head. The purpose of this design is not to hold the sprocket to the crank, but only to transfer torque. Using this design allows small spacers to be inserted between the arm and the sprocket to dial in the chainline.


Nano-drive

As Sprockets reduced in size (with flatland at the forefront), a need for less offset in the mounting position. Enter the nano-drive. Most nano-drive bosses use smaller bolts than the standard bosses.


Spline Drive

When faced with the challenge of small sprockets, Tree Bicycle Co. decided to redesign the mounting design. What they came up with was transfering torque through the spindle, rather than the crank arm. With most cranks now using 19mm, 48 spline, Tree's spline drive has a large potential market. Recently Profile decided to release their own version of spline drive (releasing a spline drive sprocket was logical for Profile as they are known for their 48 spline cranks). Unfortunately, Profile decided it was best to use 8 large splines on the adapter, rather than the 9 available on the Tree. I don't know why this happened, but it may be just to avoid any patent issues.

There is one big problem with spline drive: it is limited to 19mm, 48 spline cranks.

Socket Drive/ Nonogram

Flatware's (Odyssey) response to shrinking sprockets was to standardize. Well, sort of. They are the only company making a crank that works with the 9-sided mating surface, but do provide the specs and drawings(PDF) on their site. If this design is adopted, adapters can be made to adapt socket drive to a 48-spline crank, in effect making it another spline drive. The big advantage to this over standard spline drive is it does not limit the spindle design.


Wednesday, January 20, 2010

KHE Clone Hubs: Calculating Slack

I recently posted this on BMX-U


Ok, this should apply to all KHE Clone coasters, as well as Odyssey and other "butterfly spring" coasters (though they may have different room in the hubshell. However, if you have an externally adjustable hub, you will just have to measure by backpedalling 1 revolution to 0* (or 90, whatever works for you), then pedaling forward and guestimating. Note: You cannot get 90* slack on these hubs, even with a relatively low 2.5 gearing and min spacers!


Driver/clutch thread pitch: 15mm per rotation (23mm/1.53 total)

KHE Spacer thickness: 1mm

Tophat Spacer: 5/7.5mm depending on orientation.


X= Total spacer stack (i.e. tophat set regular 7.5mm + 1mm spacer = 8.5)

G= Gear Ratio or Chainwheel (sprocket) size / Driver size (i.e. 25/9= 2.78)


( 12.7 - X ) / 15 * 360 / G = Degrees slack at pedals*


*assuming good chain tension, etc.

Tuesday, January 19, 2010

Rim Materials

Just a reference of Rim Materials:


Density: 2.70 g/cc
Brinell Hardness: 95
Yield Tensile Strength: 276 MPa


Density: 2.72 g/cc
Brinell Hardness: 120
Yield Tensile Strength: 359MPa


Density: 2.78 g/cc
Brinell Hardness: 94
Yield Tensile Strength: 290 MPa


Density: 2.81 g/cc
Brinell Hardness: 150
Yield Tensile Strength: 503 MPa


Interesting results. I don't think 7075 is really used in extrusions, but I thought it was an interesting comparison. I first heard of 6066 when I looked at the Eclat Rims.

Monday, January 18, 2010

Handlebar-stems: An analysis

Ever since I saw the Cinelli Ram handle-stem, I have been fascinated with why we haven't moved to integrating in BMX. In this posting, I aim to to address the issues that come up in the upper steering system.


Note: a discussion on BikeGuide has pointed out two things: 1) I jump to the conclusion that forward/backward loads will not bend your bars without evidence; 2) The major challenge with 1-piece systems are their lack of adjustability both in reach (stem length) and bar angle (if, for some reason you don't want it in line...)


Vertical loads defined by loading both ends of the bar equally. In this case, the bends are stressed, and once the load exceeds the yield strength of the material, it will deform plastically (i.e. bend). During vertical loads, the stem is stressed vertically. Although longer stems will act as longer levers, when was the last time you bent a stem down?


Torsional Loads are typically qualified by loading of one side of the handlebar. These loads exhibit the traditional stress to the bends, but create a torsional load on the stem. A quick side note: torsional stiffness is proportional to stem body diameter, material choice, and thickness


Forward Loads are those times when you land a bit flat-bottom and find yourself shoving the handlebars forward. These loads are not characterized by large forces, but often end in the bars slipping in the stem. Promptly followed by a trip to the tool bag. Now some people claim that it is better the bar slips in this situation (or the opposite load where the front of the bars are loaded backward). The probability that either of these situations would end in plastic deformation is very small. Seeing as forward/backward loads are the only loads that can make the stem slip, and there is little chance of damaging the bars, I see little reason to not fix the bars to the stem.


So what do I propose? I would like to see more integrated bar-stems in the BMX market. As we get more market saturation, integrated bar-stems will be available in all the different geometries stems and handlebars come in. And let's face it, there are so few innovations in handlebars, the sector could use a bit more spice. We'll have to change our perspective on how these are clamped on the steerer tube, but that will spur innovation, and reduce overall weight.


Some examples...