Monday, March 22, 2010

A closer look at detanglers (Gyros)

Although they have gone a bit out of fashion, I have always found detanglers to be an integral part of my brake setup for two reasons:
  1. I NEVER have to unwind my bars/cable(s)
  2. Properly setup, the load is distributed over two cables, rather than one. This leads to an increase in stiffness, as well as providing a failsafe in the event that one cable snaps.
On that note, I highly suggest the use of a dual cable setup (either with an Odyssey Modulever, or something like the Dragonfly/Snafu adapter) and brake noodles for the lower bends.


Note: No detangler manufacturer recommends disassembling their units, nor should it be necessary unless you lubricate a bushing detangler. But I find these things fun and throw caution to the wind :)


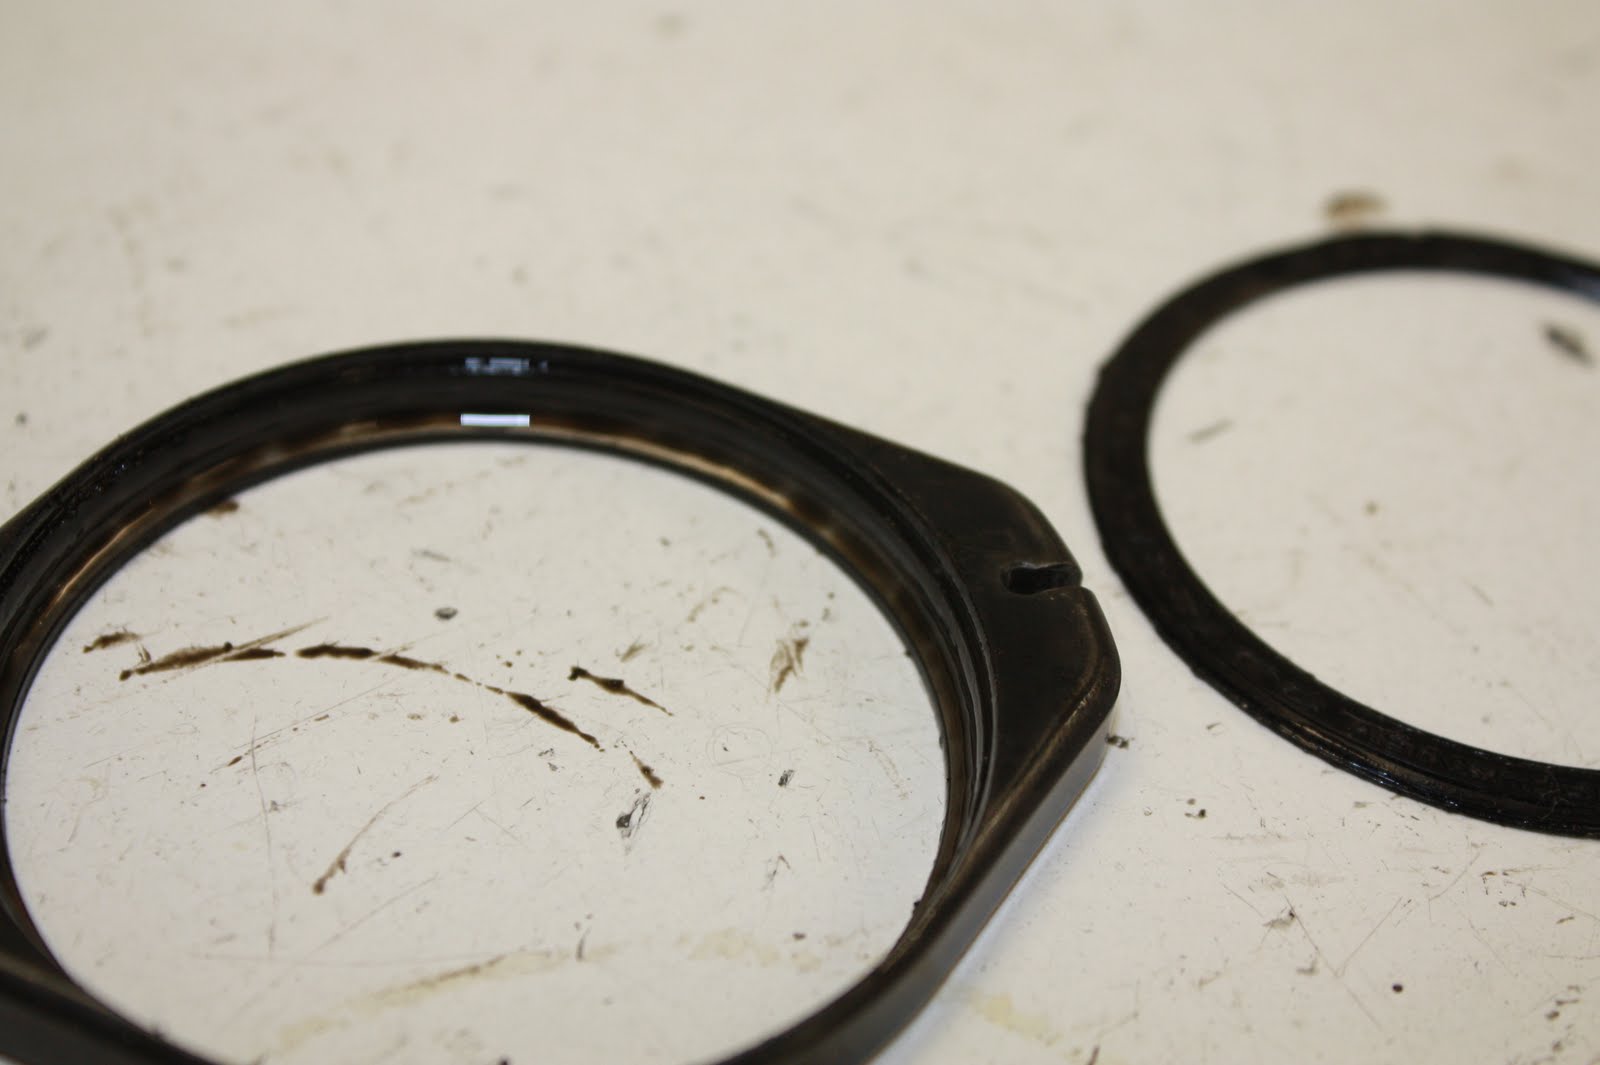
But this post is about the guts of detanglers, so lets get on to that. The original Gyro (or Oryg) is pretty easy to figure out: 2 pieces of stamped and bent steel with loose-ball bearings. These use no lubrication; actually, they require no lubrication be used. By doing so, debris is able to freely pass through the bearing mechanism without being trapped by lubricants.

Advantages:
  • Cheap and easy to manufacture
  • Replacements are available at almost all bicycle shops
Disadvantages:
  • Flexy
  • Can be noisy and not so smooth when debris is present
  • Prone to "gyro flop" where the detangler shifts side to side due to uneven cable lengths (which can be adjusted out, but is more difficult than newer detanglers)


Next came the Odyssey GTX sealed bearing detangler(s). The original steel has been discontinued due to much better sales of the lighter GTX-R aluminum version. Both are a good improvement on the above Gyro.

Advantages:
  • Sealed to keep things running smooth for a good long while
  • Very stiff assembly reduces the incidence of "gyro flop"
  • GTX-R (aluminum) is a good bit lighter and available in red and blue anodizing
  • Long lasting (I have never worn one out)
  • Built in set screws for custom cable setups
  • Can be disassembled with a flat head screw driver
Disadvantages:
  • Set screws tend to fray cables, deterring many people from using them
  • Virtually all cable heads require modification to not hit one another. The main culprit is the seats for the cables were machined shallow to allow for the set screws
  • Significantly more expensive than competition
  • Difficult to rebuild as balls do not easily hold in the retainer


A response to the GTX by Snafu, and more recently Stolen, is a simple Teflon bushing detangler called the Mobeus (or Satellite).

Advantages:
  • Cable heads sit snug and clear one another
  • Bushing requires no lubrication
  • Lower cost and weight than GTX (though the GTX-R is within 0.2 oz)
  • Low profile
Disadvantages:
  • When lubed, debris builds up quickly and rapidly degrades performance
  • Some people complain of binding when pulling the brakes during a tailwhip
  • More prone to "gyro flop" than the GTX, but less than Gyro/Oryg
  • Requires snap ring pliers to disassemble


Wednesday, March 10, 2010

An Issue (and Solution) with Investment Casting

I was flipping through the Industrial Design Guide that I posted up a few weeks ago, and came to the page about investment casting. When I read some issues with the casting process. Typically, when the metal is poured into the mold, there are some unindented inclusions like Oxygen, metals, or other containments. Also, the act of pouring the metal creates turbulence and may allow pores to form, leading to compromised product integrity.

A solution to this is the Hitchner Counter Pressure Process. Basically it is filling a mold from the bottom up: You use vacuum pressure to pull the molten metal into the mold at a controlled rate. By doing so, the metal flows freely, with significantly reduced turbulence, and a better finished product. Certainly, there is an initial investment cost for moving to this method. But as with all manufacturing, diligence in pursuing cost-effective advancements will lead to better competitiveness.

Tuesday, March 9, 2010

Fair Wheel Bikes Road Hubs Review

Wow, what a massively comprehensive review. Thanks to the guys at Fairwheels for their continued contributions to the cycling community! Although it is all road stuff, There is quite a bit we can take from this. I'll write a post sometime soon discussing the various designs available for cassettes. And here is an interesting quote about bracing angle. I am sure the square rule works well as an approximation for road wheels, but I wonder if it is accurate as we get down to smaller rim diameters:

Notes on Bracing angle: Bracing angle (or flange offset) is the most important factor effecting the lateral stiffness and stability of the wheel. The lateral stiffness imparted by the spokes goes up with the *square* of the bracing angles, while using more or heavier spokes only results in a linear increase in stiffness... and an increase in weight.


And now for some hub porn

C-4 Flangeless
Image


Alchemy with super wide bearing and flange spacing
Image

Tune carbon-wrapped flangeless:
Image
Alchemy rear with bearings inside and outside driver to maintain concentricity

Image


Tune with Carbon-fiber axle. Who wants to be the first to test this with pegs ;)

Image

Monday, March 8, 2010

Some updates to the blog

I finally found the motivation to do some regular maintenance to the blog. I went through all of the posts and added labels. Hopefully this will make it a bit easier to reference and navigate. The "cloud" of labels is on the left side of the blog. Give it a try and let me know what you think (i.e. do you just want a list?).

Also, I noticed that I never linked to the bearing article I posted a few months ago. By now, that information is up at BMX-U, so have a look.

Some BMX Tech issues

Some of you may have noticed that when you went to bmxtech.blogspot.com over the weekend, it would redirect to some funky (and likely malicous) site. Apparently it was tied to the hit counter gadget. Thanks to this article for explaining the issue. I hope none of you got into trouble with this.

Wednesday, March 3, 2010

Swaging

I've noticed a lot of forks and frames using "swagged" and tapered tubes. But what exactly is swagging? Usually it is a colt working or forging operation to reshape a tube. Here is the Wikipedia link. And some videos: 1, 2, 3

Although the three videos here show increasing the tube size, it is used in BMX to reduce or reshape the tube.

Tuesday, March 2, 2010

Chain Tensioners

... Or wheel positioners. It really depends on your purpose for putting them on. You may want them to maintain a consistent chain tension, like my tail-whip fiending friend, so the pedals will stay in position when your feet leave them. Or perhaps your wheel moves on you when you don't have it slammed in the dropouts, but slammed, the chain is too loose. A positioner will allow you to give extra support to prevent the wheel from moving. This post will analyze the various types of possitioners available and weigh their pros and cons against one another.


Pull-Type
The original tensioner design consists of a washer around the axle, with either a stud and nut, or bolt. The bolt/nut tightens against a plate on the end of the dropout
Some pull-type tensioners have issues with shorter dropouts. But as of late, slimmed down designs (such as the Poverty Short Stop shown above) have almost done away with that problem.

A variation on the design is the Premium SS Tesnioner, which uses the bolt to push directly against the dropout. With the proper bolt size, this tensioner can work with any size dropout. Unfortunately with only a bolt in contact with the curved end of the dropout, it can move around pretty easily.


Push-type
These tensioners have appeared in recent years in two variations:

1. Integrated tensioners into the dropout use a set screw or bolt through the dropout to push the wheel back and into possition. The pressure on the axle threads may compact them slightly. This may cause some issues on hubs with threaded collars, and may allow the wheel to slip forward slightly as the threads compact. (ex: Sunday wave dropouts)


2. Bolt-on tensioners use a bolt-on tab similar to gyro tabs and cable guides. They push on the hub collar rather than the axle itself. In some cases there can be interference with the chain and/or driver. (ex: Fly Tierra)


Spacer type
In the past, riders have jammed various items between their axle and dropout to allow their wheel to be "slammed". I used aluminum cable ends crushed down and carefully inserted, but they would continue to compact, and were difficult to work with. Simple BMX has come out with specially cut spacers in 0.1mm variations. With the availability of half-links (albeit current designs are rather flawed in that they stretch easily), a wheel only needs up to 13mm of adjustment as the chain is 12.7mm pin-to-pin. Unfortunately there are reports of these compacting down (or more likely compacting into the threads of the axle)


Drive vs. Non-drive
With the chain on the drive side, tensioners only need to work in one direction (the chain works in the other). As such, tensioners have been designed to work only moving the wheel out of the dropouts. The problem arises when working with the non-drive side, especially with pegs. When a load is taken pushing the drive side axle out of the dropouts (such as an ice pick or tail tap), the tensioner does not support the wheel, and thus it can move out of position. To fix this problem, we may want to start looking into a hybrid push-pull tensioner. I have done some work integrating this into a hub collar and/or guard. I'll post up more info when I get some prototypes done...

Monday, March 1, 2010

Book Recommendations

I've been doing some reading as of late. Here are two of the books I found most useful:


Industrial Design by Jim Lesko

I picked this book up at the local library expecting the usual design crap: Furnature, cars, and hubless wheels. To my surprise, I found a well organized overview of manufacturing methods for a variety of materials. The book doesn't go too in depth into any particular subject, but it provides a nice introduction and reference for the aspiring product designer. More than just an easy read, Lesko includes many informative diagrams. These pictures are worth a thousand words; I highly recommend this to anyone getting into the field/hobby/whatever.


The Ice Cream Maker by Subir Chowdhury

I know what you are thinking, "what the hell does this have to do with BMX?" This short (115 pg.) book is the tale of an ice cream factory manager who develops his company into a more efficient, competitive, and quality-focused organization. The book focuses on how supporting your customers and community (that includes everyone from the employees, to the people who live around you), in order to create a healthier, more self-sufficient organization. For any of you in management, or looking to get into business for yourself, this is a required read :)